Quick Start
Try Skygear
You may try out Skygear JS SDK quickly by these two ways:
- JSFiddle code snippet: To take a quick sneak peek of how the API works.
- React scaffolding: Start with a React.js template.
You can obtain your own server endpoints and API keys by signing up for a free Skygear account here.
Get started with JS Demo Projects
Alternatively, you might want to get started with Skygear using the following demo projects:
- HTML5: Web Dinner Poll: This is a simple dinner polling app demonstrating the usage of Skygear as a cloud database.
- Ionic: Todo List: This is a simple ToDo List app written in AngularJS demonstrating the usage of Ionic Framework and Skygear JS SDK.
- React: Chat App: This is a simple chat app demonstrating the usage of Skygear Server with the chat plugin.
- Slackbot: Lunchbot: This bot allows your Slack team to create a list of places for lunch and the bot will suggest a place to eat based on a schedule.
- You can view a full list of JS demos / tutorials at github.com/skygear-demo
Install Skygear in your app
This guide will walk you through the steps to add Skygear to your HTML5 project and Node.js project from scratch.
Prerequisite
- A Skygear account. Sign up here.
Step 1: Install the Skygear JS SDK and configure Skygear
There are two ways you might use Skygear JS SDK:
- Use the SDK in HTML with CDN
- Import the npm package
Method 1: HTML5 project (CDN)
Add the following lines into the header of your HTML file.
<!--Skygear CDN-->
<script src="https://code.skygear.io/js/polyfill/latest/polyfill.min.js"></script>
<script src="https://code.skygear.io/js/skygear/latest/skygear.min.js"></script>

<!--Skygear configuration-->
<!--The app end point and the api key can be found in the developer portal-->
<script>
  skygear.config({
    'endPoint': 'https://<your-app-name>.skygeario.com/', // trailing slash is required
    'apiKey': '<your-api-key>',
  }).then(() => {
    console.log('skygear container is now ready for making API calls.');
  }, (error) => {
    console.error(error);
  });
</script>
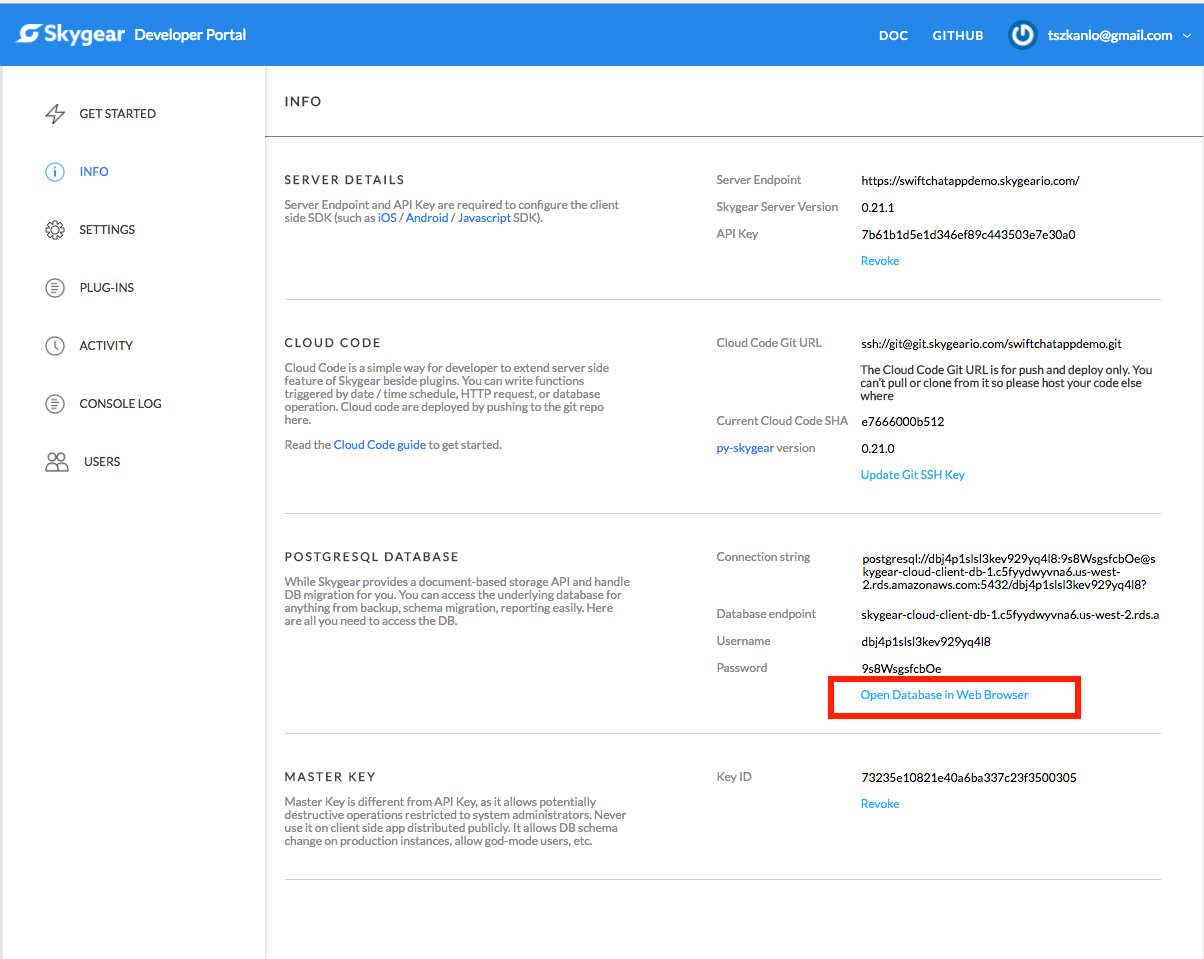
You can get your server endpoints and the API keys in the info page in your developer portal after signing up for the Skygear Cloud Services.
Method 2: Node.js project
- Add Skygear to your Node.js project using npm install.
npm install skygear --save
- Then require it from any JavaScript file:
var skygear = require('skygear');
If you are using ES2015, you can import the module instead:
import skygear from 'skygear';
- To configure Skygear in your app , add the following lines in the JS file.
skygear.config({
  'endPoint': 'https://<your-app-name>.skygeario.com/', // trailing slash is required
  'apiKey': '<your-api-key>',
}).then(() => {
  console.log('skygear container is now ready for making API calls.');
}, (error) => {
  console.error(error);
});
You can get your server endpoints and the API keys in the info page in your developer portal after signing up for the Skygear Cloud Services.
That is it. You are good to go now. You can continue with the step below to learn about basic database operations.
Step 2: Create your first record in Skygear
Now, let's create a record in the Skygear database to see if the SDK has been installed successfully.
Add the following lines after the skygear.config function using promise to create a record. This is how the codes should be placed.
Practically the codes should not be structured this way. It is for demo only.
skygear.config({
  'endPoint': 'https://<your-app-name>.skygeario.com/', // trailing slash is required
  'apiKey': '<your-api-key>',
}).then(function() {
  // Every record in Skygear must be owned by a user
  // For testing purpose, we have used signupAnonmously to create a record
  // Visit the user authetication documentation to learn more
  // https://docs.skygear.io/guides/auth/basics/js/
  return skygear.auth.signupAnonymously()
}).then(function() {
  // Create Record Type "test" and put "Hello world" as value of key "content"
  // Advanced: Skygear Server will create a table "test" and appropriate
  //           columns in PostgreSQL in Development mode.
  var Test = skygear.Record.extend('test');
  return skygear.publicDB.save(new Test({
    'content': 'Hello World'
  }));
}).then(function(record) {
  console.log('Record saved');
}).catch(function(err) {
  console.error('Error: ' + err.message);
});
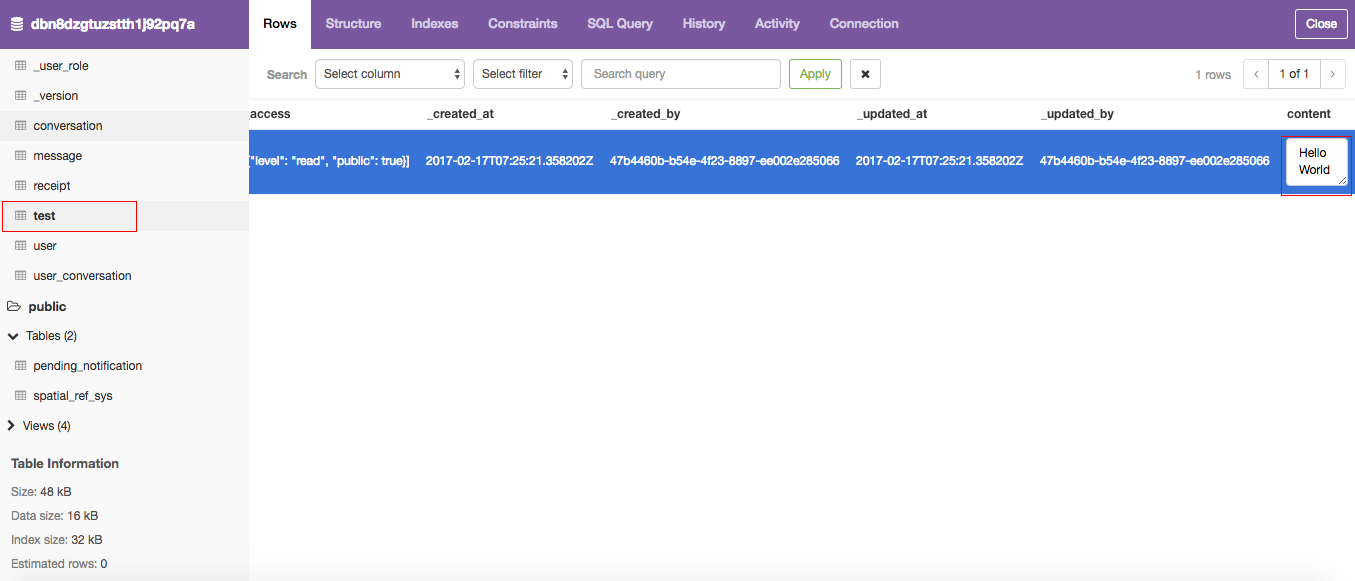
If the record is created successfully, you should see the record "Hello World" in your database table "test".
You can access your database using the data browser we provide. It can be found from the info page in your developer portal.

This is how your data browser will look like.

You can access Skygear database in 3 ways.
- Web data browser: It can be found from the info page in your developer portal.
- PostgreSQL client: Skygear database can be viewed in any PostgreSQL client. Get the connection string from the info page in your developer portal. We recommend using Postico.
- Skygear CMS: Skygear CMS is a business-user friendly web interface that allows users to edit the data in the database. To use the CMS, you have to enable it in the plug-ins page in the developer portal. Your CMS URL is
https://insert-your-app-name.skygeario.com/cms.
Hurray! Everything should be in the right place from here.
What is next?
Next, you may want to learn more about: