You are viewing Skygear v1 Documentation.Switch to Skygear v0 Documentation

Quick Start

This guide will walk you through the steps to add Skygear to your iOS project via CocoaPods from scratch.

Prerequisite

Step 1: Install CocoaPods

We recommend you to install the Skygear iOS SDK via CocoaPods. Run the following command in your terminal to install it.

$ sudo gem install cocoapods

Step 2: Install the Skygear iOS SDK

  1. Create a new Xcode project or use your existing one. Initiate pod if you have not.
cd your-project-directory
pod init
  1. Open Podfile and add the following line to include SKYKit (Skygear iOS SDK) in your project.
pod 'SKYKit', '~> 1.1'

Note: It is not a must to specify the version number (i.e. 1.1). If you don't, your app will be using the latest SDK version automatically. Check out all the version numbers here.

  1. Lastly, run pod install in your terminal.
pod install
  1. The Skygear iOS SDK will have been installed.

Step 3: Configure Skygear in your app

  1. In AppDelegate.m or AppDelegate.swift, import the Skygear iOS SDK.
import <SKYKit/SKYKit.h>
import SKYKit
  1. Then add the following lines in the application:didFinishLaunchingWithOptions method to configure your app.

    • For Skygear iOS SDK with version 1.6.2 or before.
    SKYContainer *container = [SKYContainer defaultContainer];
    [container configAddress:@"<Your endpoint url>"];
    [container configureWithAPIKey:@"<Your api key>"];
    
    SKYContainer.default().configAddress("<Your endpoint url>")
    SKYContainer.default().configure(withAPIKey: "<Your api key>")
    
    • For Skygear iOS SDK with version 1.6.3 or later.
    SKYConfiguration *config = [[SKYConfiguration alloc] init];
    config.endPointAddress = [NSURL URLWithString:@"<Your endpoint url>"];
    config.apiKey = @"<Your api key>";
    [[SKYContainer defaultContainer] configure:config];
    
    let config = SKYConfiguration()
    config.endPointAddress = URL.init(string: "<Your endpoint url>")!
    config.apiKey = "<Your api key>"
    SKYContainer.default().configure(config)
    

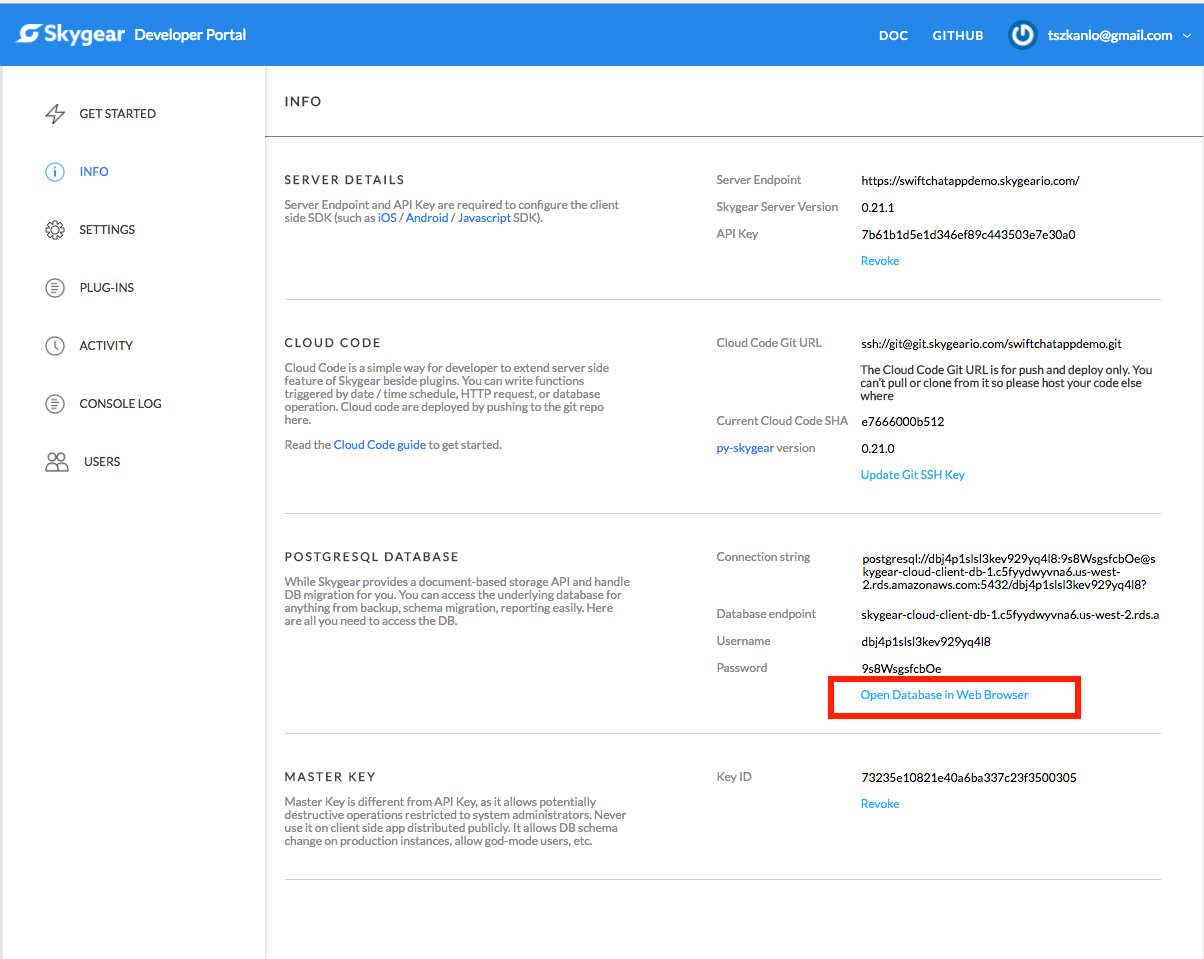
You can get your server endpoints and the API keys in the info page in your developer portal after signing up for the Skygear Cloud Services.

That is it. You are good to go now. You can continue with the step below to learn about basic database operations.

Step 4: Create your first record in Skygear

Now, let's create a record in the Skygear database to see if the SDK has been installed successfully.

Add the following lines in the application:didFinishLaunchingWithOptions method and run your app in a simulator. The record will be created when you run your app.

Practically the codes should not be structured this way. It is for demo only.

// Every record in Skygear must be owned by a user
// For testing purpose, we have used signupAnonmously to create a record
// Visit the user authetication documentation to learn more
// https://docs.skygear.io/guides/auth/basics/ios/

SKYContainer *skygear = [SKYContainer defaultContainer];
[[skygear auth] signupAnonymouslyWithCompletionHandler:^(SKYUser *user, NSError *error) {
    if (error != nil) {
        NSLog(@"Signup Error: %@", error.localizedDescription);
        return;
    }

    // Create Record Type "test" and put "Hello world" as value of key "content"
    // Advanced: Skygear Server will create a table "test" and appropriate
    //           columns in PostgreSQL in Development mode.
    SKYRecord *test = [SKYRecord recordWithRecordType:@"test"];
    test[@"content"] = @"Hello world";

    [skygear.publicCloudDatabase saveRecord:test completion:^(SKYRecord *record, NSError *error) {
        if (error != nil) {
            NSLog(@"Failed to save a record: %@", error.localizedDescription);
            return;
        }

        NSLog(@"Record saved with ID: %@", record.recordID.recordName);
    }];
}];
// Every record in Skygear must be owned by a user
// For testing purpose, we have used signupAnonmously to create a record
// Visit the user authetication documentation to learn more
// https://docs.skygear.io/guides/auth/basics/ios/

let skygear = SKYContainer.default()
skygear.auth.signupAnonymously(completionHandler: { (user, error) in
    if error != nil {
        print("Signup Error: \(error?.localizedDescription)")
        return
    }

    // Create Record Type "test" and put "Hello world" as value of key "content"
    // Advanced: Skygear Server will create a table "test" and appropriate
    //           columns in PostgreSQL in Development mode.
    let test = SKYRecord(recordType: "test")
    test.setObject("Hello world", forKey: "content" as NSCopying!)
    skygear.publicCloudDatabase.save(test, completion: { (record, error) in
        if error != nil {
            print("Failed to save a record: \(error?.localizedDescription)")
            return
        }
        print("Record saved with ID: \(record?.recordID.recordName)")
    })
})

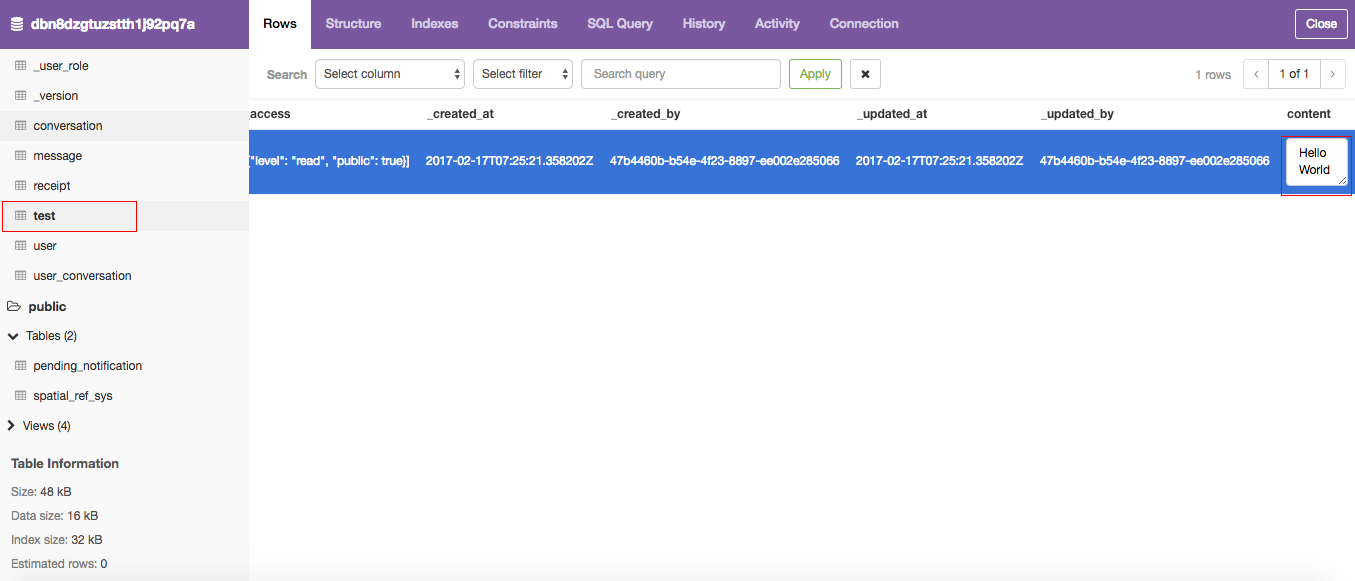
If the record is created successfully, you should see the record "Hello World" in your database table "test".

You can access your database using the data browser we provide. It can be found from the info page in your developer portal.

Skygear portal

This is how your data browser will look like.

Web database viewer

You can access Skygear database in 3 ways.

  1. Web data browser: It can be found from the info page in your developer portal.
  2. PostgreSQL client: Skygear database can viewed in any PostgreSQL client. Get the connection string from the info page in your developer portal. We recommend using Postico.
  3. Skygear CMS: Skygear CMS is a business-user friendly web interface that allows users to edit the data in the database. To use the CMS, you have to enable it in the plug-ins page in the developer portal. Your CMS URL is https://insert-your-app-name.skygeario.com/cms.

Hurray! Everything should be in the right place from here.

What's next?

Next, you may want to learn more about: